Cheek burn. That hot feeling in your face when something is going horribly wrong. When panic starts to set in and you are scrambling as fast as you can to control the damage. I’ve had cheek burn a few times, but few were as stressful as those times years ago, before I knew about other methods of deploying APEX applications, when the browser UI interface would just time out during a ‘push to prod’, leaving chunks of my app somewhere in cyberspace. This can happen when an app grows too big.
If this happens, you might decide to break your development out into smaller applications rather than having one massive application. If you do decide to break things up, you don’t want the user to feel it. This means no context switching, and you’ll want the same look and feel throughout. This will likely involve subscriptions to common Shared Components, common themes, but also a shared navigation bar. If you add, remove or change the condition on an option to the nav bar in one app, you don’t want to have to go manually make the same change in all of your apps. Here is how you can implement a Shared Navigation Bar across multiple applications.
Cookies
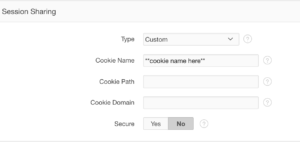
You’ll want to make sure all your apps use the same cookie. This means that once a user is authenticated to one app, they can navigate seamlessly to other apps without having to log in again.
Go to Shared Components –> Authentication Schemes –> Edit your current authentication scheme –> Click on Session Sharing, and enter a cookie name. Do the same in all applications that are linked.
Global Application Items
It is highly likely that your applications might need to access common application items. For example, something like P_USER_ID. You will want to create these in each of your applications, but if you make them GLOBAL, once their value is set in one application (for example, in a login process), other applications will be able to access their value in session state.
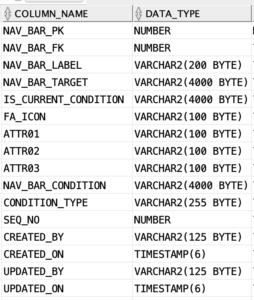
Table to store your Navigation Bar
The easiest way to centralize your navigation bar is by storing it in a table in the database. If you need a nested navigation bar (with drop downs and sub menus), you’ll want to include a parent column in order to render your hierarchical query. This is what my Navigation Bar table looks like, and you might notice it looks an awful lot like the APEX syntax for dynamic lists. The NAV_BAR_TARGET will contain things like: f?p=APP_ALIAS1:PAGE_NUMBER:SESSION::::, or f?p=APP_ALIAS2:PAGE_NUMBER:SESSION:::, jumping off to the different applications.
Just like with a static list you’d create in Shared Components, you might have some entries that are conditional. In other words, some menu items might be hidden from users unless they have a certain role.
We use the nav_bar_condition column in the table and capture a select statement that must return at least 1 row in order for the option to appear in the menu.
For example:
Select 1 from dual where v(‘G_ROLE’) = ‘ADMIN’
We then use a function that evaluates the statement using an ‘execute immediate’ and returns either a 1 or 0. We then use this function in our dynamic list query (see below).
Package to render the list query
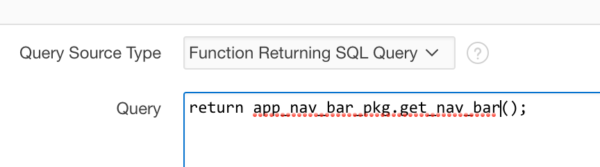
We know that if we want to create a dynamic list in Shared Components, APEX will expect a query like this:
SELECT level, labelValue label,
       [targetValue]            target,
       [is_current]             is_current_list_entry,
       [imageValue]             image,
       [imageAttributeValue]    image_attribute,
       [imageAltValue]          image_alt_attribute,
       [attribute1]             attribute1,
       [attribute2]             attribute2,
       [attribute3]             attribute3,
       [attribute4]             attribute4,
       [attribute5]             attribute5,
       [attribute6]             attribute6,
       [attribute7]             attribute7,
       [attribute8]             attribute8,
       [attribute9]             attribute9,
       [attribute10]            attribute10
FROM ...
WHERE ...
ORDER BY ...
So we created a package that contains 2 functions:
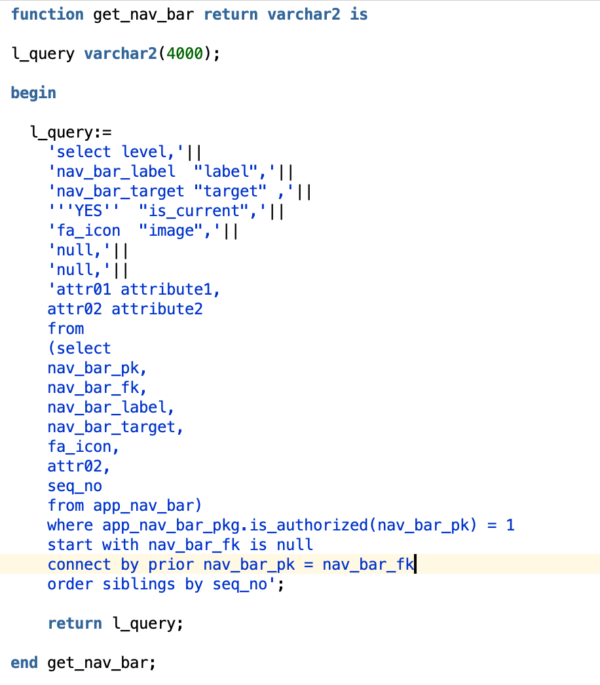
get_nav_bar: returns a query in the format APEX is expecting, using the entries in our table.
is_authorized: evaluates the nav_bar_condition field of the table to determine whether or not the entry should be rendered, using execute immediate.
The code for the get_nav_bar function can be as simple as:
Create your Lists in Shared Components
Sadly, you will have to create the list in each of your applications, but because your lists are dynamic and rendered using your package, you will only have to set them up once and never touch them again. Any new entries or changes in conditions will be handled in the table and automatically propagate to your applications. MAGIC!!
Shared Components –> Lists
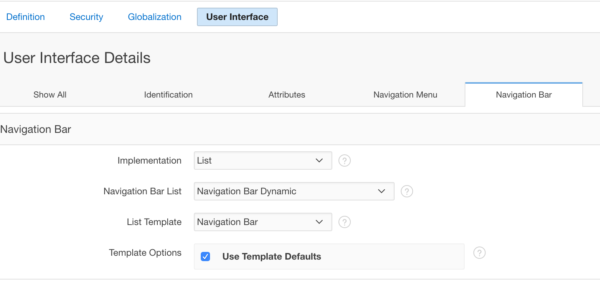
Then, make sure you select this new dynamic list in Shared Components –> User Interfaces –> Navigation Bar
And voilà! You have a dynamic navigation bar that you can control with conditional entries, shared amongst any number of applications. Your users will never guess they may have jumped from 1 APEX application to another.
Have you implemented any shared navigation bars? If so, how did you do it? Would love to hear from you in the comments!
APEXionately yours,
Michelle